Custom Post Type (CPT)
1. Using Option Builder
The framework includes a powerful option builder to easily create post types.
php
use CodexShaper\Framework\Builder\CustomPostType;

CustomPostType::create(
    'custom_post', // Post Type ID
    array(
        "post_type"     => "custom_post",
        "name"          => "Custom posts",
        "singular_name" => "Custom post",
        "plural_name"   => "Custom posts",
        "supports"      => array(
            "title",
            "editor",
            "author",
            "excerpt",
        ),
        "rewrite"       => array(
            "slug"       => "custom-post",
            "with_front" => false,
        ),
        "exclude_from_search" => true,
        "has_archive"         => true,
        "publicly_queryable"  => true,
        "hierarchical"        => false,
        "show_in_menu"        => true,
        "show_ui"             => true,
        "show_in_nav_menus"   => true,
        "menu_icon"           => false,
    )
);| Argument | Type | Default | Description |
|---|---|---|---|
post_type | string | - | Unique slug/ID for the custom post type. |
name | string | - | Plural label (e.g., "Books"). |
singular_name | string | - | Singular label (e.g., "Book"). |
plural_name | string | - | Another way to specify plural form. |
supports | array | title, editor | Features like title, editor, author, thumbnail, comment, excerpt etc. |
rewrite | array|bool | true | Controls permalinks (slug, with_front). |
exclude_from_search | bool | false | Excludes from search results if true. |
has_archive | bool | false | Enables archive at /custom-dynamic-post/. |
publicly_queryable | bool | true | Allows front-end queries. |
hierarchical | bool | false | If true, behaves like pages (parent-child structure). |
show_in_menu | bool | true | Shows in admin menu or as submenu if string provided. |
show_ui | bool | true | Displays in admin UI if true. |
show_in_nav_menus | bool | true | Available in navigation menus. |
menu_icon | string|bool | false | Fontawesome class or custom icon URL. |
After executing this code, the Portfolios menu will appear in the WordPress dashboard.
2. Create from Dashboard
Navigate to CodexShaper Framework >> Custom Post Types.
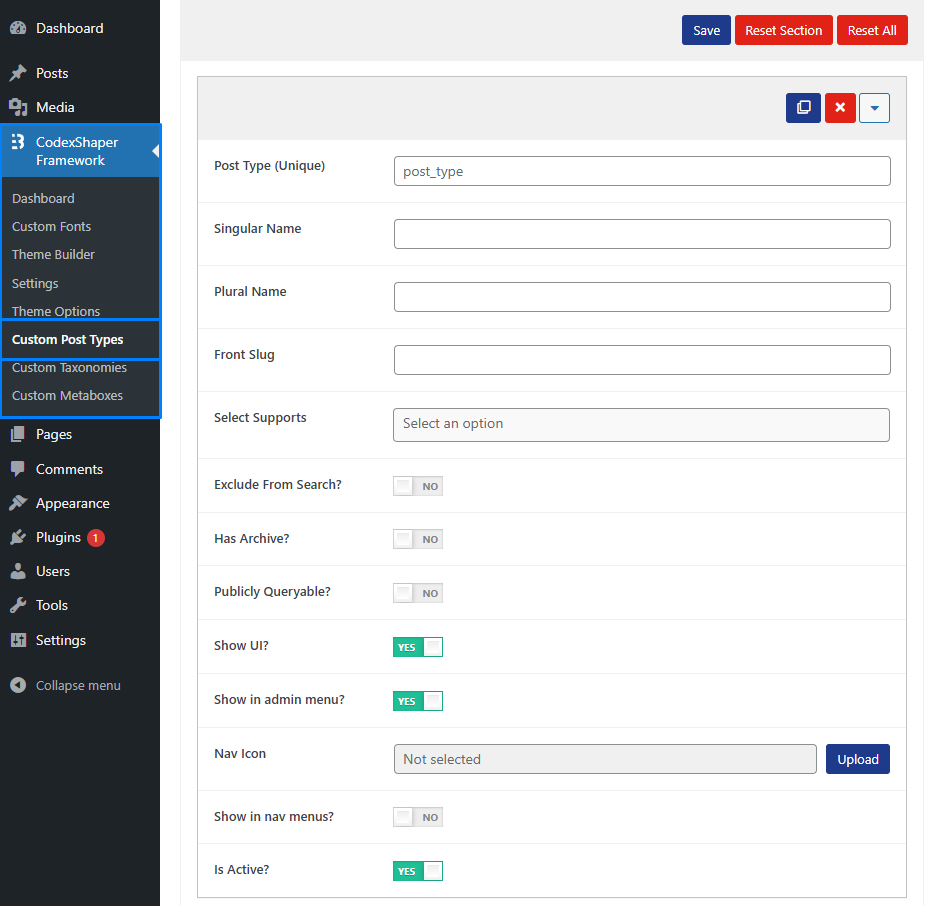
| Argument | Type | Default | Description |
|---|---|---|---|
Post Type | string | - | Unique slug/ID for the custom post type. |
Singular Name | string | - | Singular label (e.g., "Book"). |
Plural Name | string | - | Plural label (e.g., "Books"). |
Front Slug | string | - | A slug that can be used for the front-end (optional). |
Supports | array | title, editor | Features like title, editor, author, thumbnail, comment, excerpt etc. |
Exclude From Search | bool | false | Excludes from search results if true. |
Has Archive | bool | false | Enables archive at /custom-dynamic-post/. |
Publicly Queryable | bool | true | Allows front-end queries. |
hierarchical | bool | false | If true, behaves like pages (parent-child structure). |
Show in UI | bool | true | Displays in admin UI if true. |
Show in Admin Menu | bool | true | Shows in admin menu or as submenu if string provided. |
Nav Icon | string|bool | false | Fontawesome class or custom icon URL. |
Show in Nav Menu | bool | false | Toggle to show or hide in navigation menus. |
Is Active | bool | true | Set this to Yes to activate the metabox. |
Once saved, the new post type appears in the admin panel.
3. Creating Manually
Steps:
- Navigate to:sh
{project_root}/wp-content/plugins/codexshaper-framework/src/PostTypes - Create a file using
UpperCamelCase.phpnaming convention (e.g.,CustomMenu.php). - Open the file in a text editor and insert the following code:
php
<?php

namespace CodexShaper\Framework\PostTypes;

use CodexShaper\Framework\Foundation\PostType;

if ( ! defined( 'ABSPATH' ) ) {
    exit();
}

class CustomMenu extends PostType {
    public function __construct() {
        parent::__construct();
    }

    public function get_name() {
        return 'custom-menu';
    }

    public function get_title() {
        return join( ' ', array_map( 'ucfirst', explode( '-', $this->post_type ) ) );
    }

    public function get_capability_type() {
        return esc_html__( 'post', 'textdomain' );
    }

    public function get_supports() {
        return array(
            'title',
            'editor',
            'thumbnail',
        );
    }

    public function is_public() {
        return true;
    }

    public function is_publicly_queryable() {
        return true;
    }

    public function is_show_ui() {
        return true;
    }

    public function is_show_in_rest() {
        return true;
    }

    public function is_query_var() {
        return true;
    }

    public function is_unregister() {
        return false;
    }
}
Done! Your custom post type is now registered.