Skip to content

Custom Metabox

1. Create Using CLI

General Command:
sh
php wp cxf-make:metabox {custom_metabox_name}
With Specific Post Type:
sh
php wp cxf-make:metabox {custom_metabox_name} --screen={post_type_name}
  • {custom_metabox_name} → Your metabox name.
  • {post_type_name} → The custom post type name under which you want to set your metabox. If omitted, by default it will show only under post Post Type.
Naming Conventions:
  • UpperCamelCase: CustomMetaboxName (Recommended)
  • camelCase: customMetaboxName
  • snake_case: custom_metabox_name
  • kebab-case: custom-metabox-name
  • Mixed: customMetabox_Name, custom-metabox_name, Custom_metabox-name

INFO

All formats are converted to UpperCamelCase to follow the PSR-4 standard.

IMPORTANT

You cannot use Metabox as a name since it is a reserved word in the framework. Check reserved words here.

Example:
sh
php wp cxf-make:metabox TestMetabox

This command will generate all necessary files and directories to register the Metabox.

Expected CLI Response:
Success: The metabox TestMetabox's metabox directory has been created at ... <!-- Skipped if Metaboxes directory already exists -->
Success: The metabox TestMetabox's metabox file has been created at ...
Generated Files and Directories:
  • Metabox Directory (Skipped if Metaboxes directory already exists): /wp-content/plugins/codexshaper-framework/src/Metaboxes
  • Metabox File: /wp-content/plugins/codexshaper-framework/src/Metaboxes/TestMetabox.php

Necessary Methods
MethodReturnDefaultDescription
get_screen()array|stringpostSpecify one or more post types where the metabox should appear.
register_sections()--Register section and field for the metabox.

2. Using Option Builder

A powerful Option Builder allows easy creation of Metaboxes.

Example: Creating portfolio-option metabox for portfolio post type.
php
$prefix = 'cxf_metabox';

Metabox::create(
	$prefix . '_portfolio_options',
	array(
		'title'     => esc_html__( 'Portfolio Options', 'textdomain' ),
		'post_type' => 'portfolio',
	)
);

Section::create(
	$prefix . '_portfolio_options',
	array(
		'title'  => esc_html__( 'Portfolio Info', 'textdomain' ),
		'fields' => array(
			array(
				'id'    => 'portfolio_title',
				'type'  => 'text',
				'title' => esc_html__( 'Portfolio Title', 'textdomain' ),
			),
			array(
				'id'    => 'portfolio_thumbnail',
				'type'  => 'media',
				'title' => esc_html__( 'Portfolio Thumbnail', 'textdomain' ),
			),
		),
	)
);
Arguments
NameTypeDefaultDescription
titlestring-The label that appears above the field.
post_typearray|stringpostSpecify one or more post types where the metabox should appear.
fieldsarray-Specify one or more fields for the metabox.
idstring-Identifier for the field.
typestringtextField type.

3. Creating from Dashboard

  1. In your WordPress Admin Dashboard, navigate to CodexShaper Framework
  2. Click on Custom Metaboxes in the sidebar.
  3. The process involves three main steps:
    • Creating the Custom Metabox
    • Adding Sections to the Metabox
    • Adding Fields to the Sections

1. Creating the Custom Metabox

Custom Metabox Interface

NameTypeDefaultDescription
Metabox IDstring-A unique identifier for your metabox (e.g., portfolio_option).
Singular Namestring-The singular label (e.g., Portfolio Option).
Plural Namestring-The plural label (e.g., Portfolio Options).
Front Slugstring-A slug that can be used for the front-end (optional).
Select Objectstring-Choose the post type (e.g., post, portfolio, or custom type).
Is PublicbooltrueToggle to set if the metabox is public.
Publicly QueryablebooltrueDetermines if this metabox can be queried in front-end requests.
Show in UIbooltrueChoose whether this metabox should appear in the UI.
Show in Admin MenubooltrueToggle to show or hide in admin menus.
Show in Nav MenuboolfalseToggle to show or hide in navigation menus.
Show in Resetboolfalse-
Is ActivebooltrueSet this to Yes to activate the metabox.

After filling in all required fields, click Save (top-right corner).

2. Adding Sections to the Metabox

Sections help organize fields within your metabox. You can have multiple sections inside a single metabox.

Custom Metabox Section

Arguments
NameTypeDefaultDescription
Metabox IDstring-Select the Metabox you created in the previous step (e.g., portfolio_option).
Section IDstring-A unique identifier for this section (e.g., portfolio_info).
Section Titlestring-A descriptive title (e.g., Portfolio Info).
Section Parentstring-If you have multiple sections, you can nest them. Otherwise, leave blank or select “None.”
Is ActivebooltrueSet this to Yes to activate the metabox.

After filling in all required fields, click Save (top-right corner).

3. Adding Fields to the Sections

Once you have a Metabox and a Section, you can add Fields to collect or display specific data.

Custom Metabox Field

Arguments
NameTypeDefaultDescription
Section IDstring-Select the section you created (e.g., portfolio_info).
Field IDstring-A unique identifier for the field (e.g., portfolio_title).
Field Typestring-The type of field you want to create (e.g., text, upload, etc.).
Field Titlestring-The label/title of the field (e.g., Portfolio Title).
Field Optionsstring--
Field Defaultstring-The default value of this field.
Field Subtitlestring-A short title describing the field’s purpose.
Field Descriptionbool-A short description of the field’s purpose.
Field Classstring-Add any custom CSS classes.
Field Dependencystring-If this field depends on another field’s value, configure it here.
Field Attributesstring-Set additional HTML attributes or custom data attributes.
Is ActivebooltrueSet this to Yes to activate the metabox.

After filling in all required fields, click Save (top-right corner).

Viewing Your Custom Metabox

  • Go to the post type or taxonomy you attached the metabox to (e.g., Posts, Pages, Portfolio, or a custom post type).
  • Edit or add a new post. You should see your new Custom Metabox with the Sections and Fields you created.

4. Creating Manually

Steps:
  1. Navigate to:
    sh
    {project_root}/wp-content/plugins/codexshaper-framework/src/Metaboxes
  2. Create a file using UpperCamelCase.php naming convention (e.g., TestMetabox.php).
  3. Open the file in a text editor and insert the following code:
php
<?php

namespace CodexShaper\Framework\MetaBoxes;
use CodexShaper\Framework\Foundation\MetaBox;

if ( ! defined( 'ABSPATH' ) ) {
	exit; // Exit if accessed directly.
}

class TestMetabox extends MetaBox
{
	public function __construct() {
		// Do your settings here

		parent::__construct();
	}

	public function get_id() {
        return 'cxf_test_metabox';
    }

	public function get_title() {
        return 'Test Metabox';
    }

	public function get_screen() {
        return array( 'post' );
    }

	public function register_sections() {
		$this->add_section([
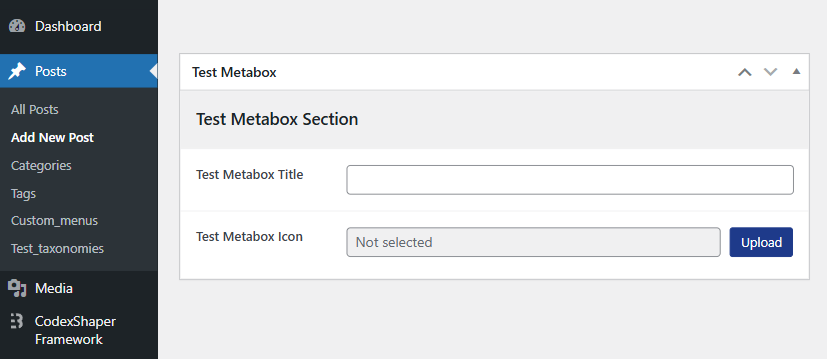
			'title' => esc_html__('Test Metabox Section', 'textdomain'),
			'fields' => array(
				array(
					'id'    => 'test_metabox_title',
					'type'  => 'text',
					'title' => esc_html__( 'Test Metabox Title', 'textdomain' ),
				),
				array(
					'id'    => 'test_metabox_icon',
					'type'  => 'media',
					'title' => esc_html__( 'Test Metabox Icon', 'textdomain' ),
				),
			),
		]);
	}
}

You should see your new Test Metabox with the Sections and Fields you created.

Custom Metabox Example