Creating Option Pages & Sections
Introduction
The CodexShaper Framework makes it easy to create custom option pages in the WordPress admin area. To display a menu in the admin, you must:
- Create an Option (using
Option::create()) which defines a top-level or submenu page. - Create at least one Section (using
Section::create()) for eachoption_keyyou used inOption::create(). - Retrieve option values using
cmf_get_option().
This document covers both steps—defining Options and Sections—and describes the parameters available for each.
1. Creating an Option
Basic Usage
Option::create(
    'option_key',
    array(
        'menu_title' => __( 'Option', 'textdomain' ),
        'menu_slug'  => 'option_slug',
        // ... other arguments ...
    )
);- The first parameter (e.g.,
'option_key') is a unique identifier for this option group. - The second parameter is an associative array of configuration arguments.
Example: Top-Level Menu & Submenu
<?php
Option::create(
    'option_key_one',
    array(
        'menu_title' => __( 'Option', 'textdomain' ),
        'menu_slug'  => 'option_slug_one',
        // Creates a top-level menu in the WP admin
    )
);

Option::create(
    'option_key_two',
    array(
        'menu_title'  => __( 'Option Two', 'textdomain' ),
        'menu_slug'   => 'option_slug_two',
        'parent_slug' => 'option_slug_one', // Ties this as a submenu of "Option"
        'menu_type'   => 'submenu',
    )
);Result:
- A top-level menu labeled Option in the WordPress admin sidebar.
- Under that menu, a submenu labeled Option Two.
WARNING
Even if you successfully create these menus, they will not appear unless you also create at least one Section for each option_key you used. See below for details.
Option Arguments
| Argument | Type | Default | Description |
|---|---|---|---|
menu_title | string | - | The text displayed in the WP Admin Menu (sidebar). |
menu_slug | string | - | A unique slug (URL-friendly string) for this menu page. |
parent_slug | string | - | If creating a submenu, set this to the menu_slug of the parent. Leave empty for a top-level menu. |
menu_type | string | menu | Determines whether it’s a top-level ('menu') or submenu ('submenu'). |
title | string | - | Title displayed on the page itself (often shown in the browser tab). |
menu_icon | string | - | Icon for top-level menus. For Dashicons, use dashicons-*; for Font Awesome, use fas fa-*. |
footer_credit | string | - | Custom text to display in the footer of the options page. |
show_footer | bool | false | Whether to display a footer section on the page. |
enqueue_webfont | bool | false | Whether to enqueue additional webfonts for the UI. |
show_search | bool | false | Shows a search bar to quickly find specific options/fields. |
show_reset_all | bool | true | Displays a "Reset All" button to revert all fields to default. |
show_reset_section | bool | false | Displays a "Reset Section" button to revert fields in the current section/tab. |
show_all_options | bool | false | If multiple sections exist, setting true shows all options on one page instead of separate tabs. |
theme | string | light | Defines a color theme or styling for your options page (e.g., 'light' or 'dark'). |
2. Creating a Section
Once you have created an Option, you must create at least one Section with the same option_key to make the menu visible in WordPress.
Basic Usage
Section::create(
    'option_key',
    array(
        'title'  => __( 'Section', 'textdomain' ),
        'id'     => 'section_key',
        'fields' => array(
            // ... necessary fields ...
        )
        // ... other arguments ...
    )
);- The first parameter (e.g.,
'option_key') must match the option_key you used inOption::create(). - The second parameter is an associative array of section configuration arguments.
Example
<?php
// For the top-level menu we created above (option_key_one):
Section::create(
'option_key_one',
array(
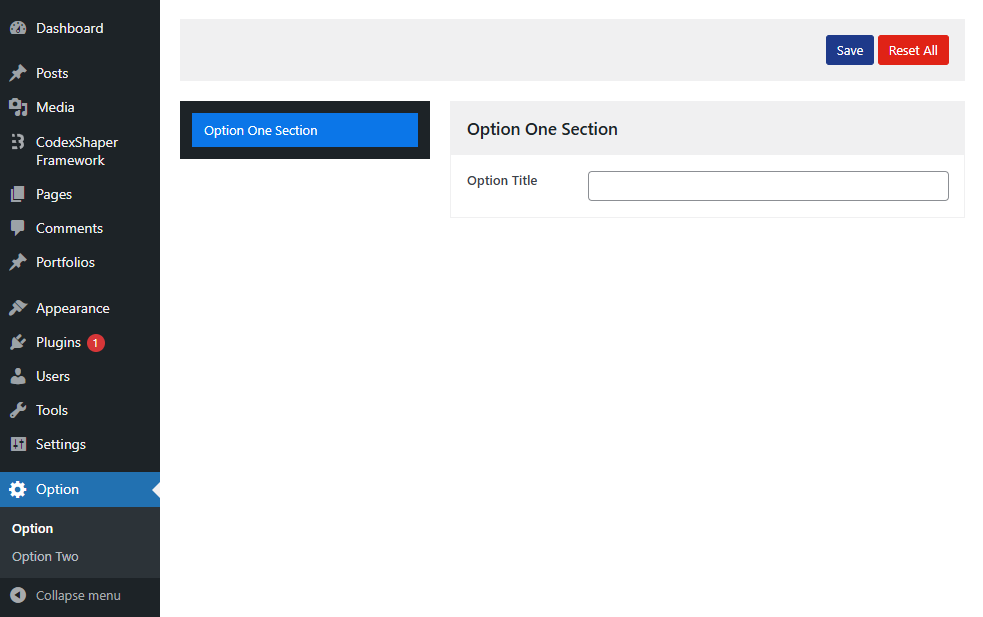
'title' => __( 'Option One Section', 'textdomain' ),
'id' => 'section_one',
'fields' => array(
array(
'id' => 'option_title_one',
'type' => 'text',
'title' => 'Option Title',
),
)
)
);
// For the submenu we created (option_key_two):
Section::create(
'option_key_two',
array(
'title' => __( 'Option Two Section', 'textdomain' ),
'id' => 'section_two',
'fields' => array(
array(
'id' => 'option_title_two',
'type' => 'text',
'title' => 'Option Title',
),
)
)
);After adding these sections, your Option menus will become visible. Each section will typically appear as a tab or panel within that options page.
Section Arguments
| Argument | Type | Default | Description |
|---|---|---|---|
title | string | - | Title of this section. |
id | string | - | A unique identifier for the section. |
icon | string | - | Icon class (e.g., fas fa-cogs) to display alongside the section title (if the framework supports it). |
NOTE
Depending on your version of CodexShaper Framework, you may have additional arguments for sections (like desc, fields, etc.).
3. Retrieving Option Values
After creating options and sections, you can retrieve saved values using the cmf_get_option() function.
Example Usage
// Retrieve a specific option
$option_one = cmf_get_option( 'option_key_one' );
$option_two = cmf_get_option( 'option_key_two', 'default_value' );

echo $option_one['option_title_one']; // id of the field
// Outputs the saved option or 'null' if not set.

echo $option_two['option_title_two']; // id of the field
// Outputs the saved option or 'default_value' if not set.
Putting It All Together
Below is a combined example showing two option pages (a top-level and a submenu) and the corresponding sections:
<?php
// 1. Create a top-level menu
Option::create(
    'option_key_one',
    array(
        'menu_title' => __( 'Option', 'textdomain' ),
        'menu_slug'  => 'option_slug_one',
        // Additional arguments as needed...
    )
);

// 2. Create a submenu under the top-level menu
Option::create(
    'option_key_two',
    array(
        'menu_title'  => __( 'Option Two', 'textdomain' ),
        'menu_slug'   => 'option_slug_two',
        'parent_slug' => 'option_slug_one',
        'menu_type'   => 'submenu',
        // Additional arguments as needed...
    )
);

// 3. Create at least one section for each option_key
Section::create(
    'option_key_one',
    array(
        'title'  => __( 'Option One Section', 'textdomain' ),
        'id'     => 'section_one',
        'fields' => array(
            array(
				'id'    => 'option_title_one',
				'type'  => 'text',
				'title' => 'Option Title',
			),
        )
    )
);

Section::create(
    'option_key_two',
    array(
        'title'  => __( 'Option Two Section', 'textdomain' ),
        'id'     => 'section_two',
        'fields' => array(
            array(
				'id'    => 'option_title_two',
				'type'  => 'text',
				'title' => 'Option Title',
			),
        )
    )
);
You should see your new Option with the Sections and Fields you created.
Tips & Best Practices
- Unique Identifiers
- Always use unique
option_key,menu_slug, andsection_keyvalues to avoid conflicts.
- Always use unique
- Icons
- For WordPress Dashicons, use classes like
dashicons-admin-tools. - For Font Awesome, use
fas fa-*orfar fa-*.
- For WordPress Dashicons, use classes like
- Multiple Sections
- You can create multiple sections for each
option_key. They’ll typically appear as separate tabs within the same option page.
- You can create multiple sections for each
- Footer & Reset
- Use the built-in features like
footer_credit,show_reset_all, andshow_reset_sectionto enhance user experience.
- Use the built-in features like
Conclusion
To create a fully functional options page in the WordPress Admin using the CodexShaper Framework:
- Create an Option
Option::create()to define the menu or submenu. - Create at least one Section
Section::create()for eachoption_keyto ensure your menu is visible. - Retrieve option values using
cmf_get_option().